Silicone vs Metal Baking Mats for Beginners
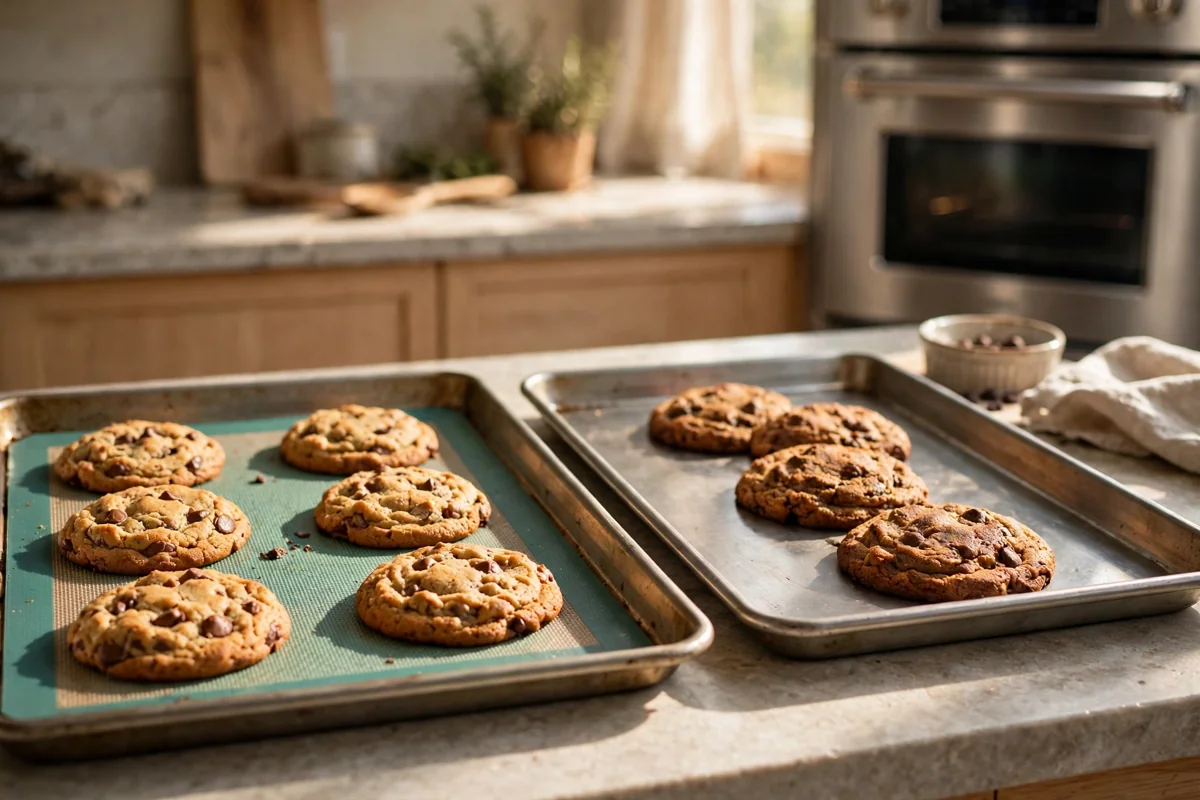
Silicone vs metal baking mats for beginners comes down to what you want from the bottom of the cookie: for crisp cookie bottoms, use a bare metal baking sheet, and for easy release and sticky foods, use a silicone baking mat on top of that same sheet. That is the short answer, and it matters because the two options do opposite things with heat — metal passes heat quickly to the dough, so the bottom sets and browns sooner, while a silicone mat sits between the metal and the dough and slows that first rush of heat, so cookies spread a little more before they set and come out with paler, softer bottoms. Neither option is wrong; the mistake is expecting one surface to give you both results at once.
Silicone vs metal baking mats for beginners — what is each option?
A silicone baking mat is a flat, flexible sheet made from food-grade silicone, usually reinforced with a fiberglass mesh inside so it lies flat and keeps its shape. You place it on top of a metal baking sheet, and it gives you a nonstick surface that you can wash and reuse. It is not a pan on its own. Without a rigid sheet under it, it will bend when you lift it, and soft dough or roasted vegetables will slide. Think of it as a reusable liner for the sheet you already own, not as a replacement for that sheet.
A bare metal baking sheet is the sheet itself, with nothing between the metal and the food except, at most, a light coating of fat for some jobs. Aluminum and aluminized steel sheets are the common choices for beginners, because they heat quickly and evenly when they are thick enough not to warp. A bare sheet gives the dough direct contact with hot metal, which is why cookie bottoms brown faster and roast vegetables crisp sooner. The trade-off is sticking and cleanup: cheese, sugar, and sticky dough can glue themselves to bare metal, and you will need to soak or scrub the sheet afterward.
This guide compares a silicone mat with a bare metal sheet only. It does not treat a thin metal mesh mat as the same thing as a bare sheet, because a mesh mat is a separate product with its own holes, cleaning rules, and fit, and beginners should not buy one expecting it to behave like a plain sheet. If you already own a mesh mat, use it for the jobs its instructions list, and judge it on its own results. For the choice in this guide, the question is simple: do you want direct metal heat, or do you want a reusable nonstick layer on top of that heat?
How do you decide, step by step?
- Start with the sheet, not the mat. Check that you have a flat, rigid baking sheet that fits your oven with room for air to move around it. A silicone mat cannot fix a warped sheet, and a warped sheet will still bake unevenly with a mat on top of it.
- Pick one test batch and split it. Make one batch of cookie dough, place half the cookies on a bare metal sheet and half on a silicone mat on an identical sheet, and keep the spacing, dough size, and oven rack the same. Changing only the surface is what makes the comparison fair.
- Bake both sheets at the same time, on the same rack if possible. If your oven only fits one sheet per rack, bake one sheet, note the time and color, then bake the second sheet right after on the same rack. Do not change the oven temperature between the two sheets.
- Compare spread, bottom color, and release. Measure how wide each cookie spread, look at the bottom color, and note whether each cookie lifted cleanly or stuck. Write the three results down for each surface, because memory alone will blur the difference by the next batch.
- Choose by job, then keep both options. Use the bare sheet for crisp bottoms and roasting, use the silicone mat for sticky foods and easy release, and store the mat flat or rolled loosely as its instructions say. Most beginners end up keeping both, because no single surface wins every job.
What does a worked example look like?
Take a batch of twelve chocolate chip cookies, with each scoop the same size, baked at 350 degrees Fahrenheit. Put six cookies on a bare metal sheet and six on a silicone mat laid on an identical sheet, with two inches between cookies on both sheets. Bake the bare-sheet cookies first and watch for the edges to set and turn golden, then check the bottoms: they should be a deeper golden brown, with edges that hold their shape. Lift one cookie with a thin spatula while it is still warm. It should release, but a little melted chocolate or sugar at the edge may stick and need a gentle scrape.

Now bake the mat cookies the same way. Expect the cookies to spread a little wider before they set, because the mat slows the first heat reaching the dough. Expect paler bottoms and a slightly softer bite, even when the tops look done at the same time. Expect release to feel easier: the cookies should lift without scraping, and the mat should wipe clean after it cools. If you wanted crisp bottoms, the bare sheet wins this test. If you wanted the easiest cleanup and the least sticking, the mat wins. Write down which result you liked for this dough, because a thicker dough or a chilled dough will shift the gap, and your note will save you from re-testing the same batch next month.
Now run the same split test with roasting, using potato wedges tossed in oil and spread in a single layer. On the bare sheet, the wedges touching the metal should brown and crisp sooner, but you will need to loosen any wedge that sticks before you turn it. On the mat, the wedges should release easily, but the undersides may stay paler unless you give them extra time. That pair of results is the whole decision in miniature: direct metal heat for crisping, a silicone layer for release.
Which option fits which job?
| Job | Silicone mat on a sheet | Bare metal sheet |
|---|---|---|
| Chocolate chip cookies | Softer, paler bottoms, wider spread, easy release | Crisp, deeper golden bottoms, less spread |
| Sticky candy or caramel | Best choice, lifts cleanly after cooling | Can glue to the metal and need soaking |
| Roasted vegetables | Easy release, paler undersides | Faster crisping where food touches metal |
| Delicate meringues | Good release, gentle heat | Can stick and brown too fast at the edges |
| Cleanup | Wipe or wash the mat after cooling | Soak and scrub stuck sugar, cheese, or fat |
| High-heat roasting | Check the mat rating first, never use under a broiler | Handles high heat when the sheet allows it |
What do you need, and what should you skip?
What you need is one flat, rigid baking sheet that fits your oven, one silicone mat cut or sized to fit that sheet without curling over the edges, and a thin spatula for lifting cookies while they are warm. A light-colored sheet is a useful starting point for beginners, because dark sheets can brown bottoms faster than you expect. Keep the mat for the jobs where release matters most, and keep the bare sheet for the jobs where crisping matters most.
What to skip, at least at first, is a second mat in a size that does not match any sheet you own, a mat that curls up at the corners, and any plan to use a silicone mat as a pan on its own. Skip cutting on a silicone mat with a sharp knife, skip placing a mat under a broiler, and skip using a mat above the temperature rating printed on it or in its instructions. A mat with cuts, cracks, or a sticky film that does not wash off should be replaced, because a damaged surface will not release evenly and may trap food in the cuts.
What mistakes should you avoid?
- Using a silicone mat as a pan with no sheet under it. Fix it by always placing the mat on a rigid baking sheet, so it cannot bend and spill soft dough or hot vegetables when you lift it.
- Expecting crisp cookie bottoms from a mat. Fix it by switching to a bare metal sheet for crisp bottoms, and saving the mat for easy release and sticky foods.
- Crowding cookies so they merge on the mat. Fix it by keeping two inches between cookies on both surfaces, because mat cookies spread a little more before they set.
- Putting a silicone mat under a broiler. Fix it by removing the mat for any broiler job and using a bare sheet or a broiler-safe pan instead, since direct top heat can damage silicone.
- Cutting food on the mat with a sharp knife. Fix it by lifting food off the mat first and cutting on a board, so cuts do not create grooves that trap food and spoil release.
- Storing a mat folded sharply or crumpled in a drawer. Fix it by storing the mat flat or rolled loosely as its instructions say, so it lies flat on the sheet next time instead of curling at the corners.
When should you stop and check?
Stop and check the temperature rating before any high-heat job. Most silicone mats are rated well below broiler heat, and a mat used above its rating can warp, smell, or break down. Never place a mat directly over a flame or under a broiler, and never use a mat that is cut, cracked, or melting at the edges. Use oven mitts when you lift a hot sheet, with or without a mat, because the sheet itself stays hot long after the oven timer ends. Let a mat cool before you wash it, and wash it as its instructions say, so trapped grease does not build up into a sticky film that makes the next batch stick instead of release.

Related on Kitchenlify
- Bakeware
- What Baking Pans Do Beginners Need First
- Why Do Cookies Spread Too Thin?
- How to Clean a Burnt Baking Sheet Without Scratching
- All guides
Frequently asked questions
Should a beginner buy a silicone baking mat or use a bare baking sheet?
Start with a good bare metal baking sheet, then add one silicone mat that fits it. Use the bare sheet for crisp cookie bottoms and roasting, and use the mat for sticky foods and easy release.
Why do cookies spread more on a silicone mat?
A silicone mat slows the first heat reaching the dough, so the dough has more time to spread before it sets. On a bare metal sheet, direct heat sets the edges sooner, so cookies stay a little thicker with deeper golden bottoms.
Can I use a silicone baking mat without a baking sheet under it?
No. A silicone mat is a flexible liner, not a rigid pan. Always place it on a flat metal baking sheet, or it will bend when you lift it and soft dough or hot food can slide off.
Can a silicone mat go under the broiler?
No. Never place a silicone mat under a broiler or directly over a flame. Check the temperature rating in its instructions, and use a bare sheet or a broiler-safe pan for broiler jobs.
Is a silicone mat better than parchment paper for cookies?
It depends on the result you want. A mat gives easy release and can be reused, but it gives paler, softer bottoms. Parchment is thin, so heat reaches the dough faster, which usually gives a crisper bottom, but you use a fresh sheet each time.
How do I clean a silicone baking mat?
Let it cool first, then wash it with warm soapy water and dry it fully before you store it. If grease builds up into a sticky film, wash it again and dry it flat, and replace the mat if the film or any cut does not clean off.
Can I cut cookies or food directly on a silicone mat?
No. Cut food on a board after you lift it off the mat. A sharp knife can cut the silicone, and those cuts trap food, spoil the nonstick release, and make cleaning harder.
Why do roasted vegetables stay pale on a silicone mat?
The mat insulates the food from direct metal heat, so the undersides brown more slowly. For crisp roasted vegetables, use a bare metal sheet, spread the pieces in a single layer, and turn them once during roasting.
How should I store a silicone baking mat?
Store it flat or rolled loosely, as its instructions say. Do not fold it sharply or crumple it in a drawer, because a creased mat may curl at the corners and bake unevenly next time.
What size baking mat should I buy?
Match the mat to your pan: a half-sheet mat fits an 18 by 13 inch baking sheet, and a quarter-sheet mat fits a 13 by 9 inch sheet. Measure your sheet before buying, because a mat that is too big bunches up and a mat that is too small leaves bare metal at the edges. Buy one mat per sheet you use weekly, not one for every pan you own.
Is a silicone mat better than parchment paper?
A silicone mat is reusable, so it saves money and waste over time, and it gives a more even bake than parchment on cookies. Parchment is better for very sticky or sugary baking, because you can throw it away, and for lining pans where a mat would slide. Use parchment when you want zero cleanup, and a mat when you bake the same thing every week.
Can I wash a silicone baking mat in the dishwasher?
Yes, on the top rack, but hand-washing with hot soapy water and a soft sponge cleans it better and makes it last longer. Do not use a scouring pad, because it scratches the surface, and do not use bleach, because it can damage the silicone. If the mat feels sticky after washing, rub it with baking soda paste, rinse, and air-dry it flat.
What is the difference between a fiberglass mat and a pure silicone mat?
A fiberglass mat has a woven fiberglass core coated in food-grade silicone, so it lies flat, heats evenly, and lasts for years, and it is the type most bakers use. A pure silicone mat has no core, so it is floppier, heats less evenly, and can warp in a hot oven. Look for a mat that says food-grade silicone with a fiberglass core, and avoid a mat that feels thin and floppy.